Showing posts with label DIY. Show all posts

23 March 2026

pots and pans organizer


Look what I made! I'm so proud of myself. This thing is STURDY. 

The previous setup was not the worst situation, but it was not ideal. 


Things got cattywampus pretty quickly, pretty often. 

I believe that if you interact with something daily, it needs to function optimally. And if you need to make an investment to make that happen, it's worth it. For someone who cooks at least 2 meals every day, I needed something better.

So I started to research pots & pan organizers, and those flimsy wire contraptions were NOT going to cut it.

I remember that my grandma had some sort of custom built-in similar to this in her kitchen, and even as a child I thought that was really cool.

Since I couldn't find anything pre-made in the size, quality, or price that I wanted, that meant it's project time. 

I drew up the dimensions, pulled out some scrap plywood & leftover paint, and went to town. FH did a few drive bys to see how I was doing (I know it drove him nuts not to help). I had to have him show me how to use the nail gun, but otherwise I did it all by myself.

Look how good it is! Nothing is wobbly, everything has a place. *wolf whistle* Hubba hubba.


Plus apparently I have space to buy 2 more pans.

18 January 2025

Skillz

Add "replacing a threshold" to the list of things I now know how to do.

The youtube videos described cutting out the old threshold, but this one was so rotted and wobbly that I could almost kick it out. Too bad, I was looking forward to using the hammer and crowbar.

The frame was pretty rotted on one side and that required some creative repairs. Three different caulks and 2 types of paint later, we're all pretty and new. And functional. The air used to blow right through that door and with the *snow* coming, the timing on this project was perfect. 

26 July 2022

Double meaning

Look what I made!


I got my inspiration from this pin that I pinned a long time ago in the original Lake House board:


Sure, I could have ordered a poster for $30, but where's the fun in that??

I made it using old fence boards and craft paint so I spent nada, and I now have a pretty cool piece of art to hang above the bed at the river.

06 March 2022

Chair makeover

I finally got around to updating this chair. (Fun fact, I still have and use all of the items I bought that day. Except the oil can.)


The fabric had worn and it was looking a little gross and shabby, so I started slowly taking it apart. I took a ton of pictures of small details as I took it apart, so that I would have that as a reference for when I put it back together. It was basically staples and glue, but there were several times where I went back and checked the pictures to make sure I had things positioned properly.


I couldn't re-use anything because the foam had dry-rotted and basically disintegrated as I pulled it off. Messy and gross. I oiled the springs so now it doesn't squeak when I sit down, and I painted it a glossy black.

I upgraded to a much thicker foam for the seat, and found some fun fabric. For the trim I was going to use matching double cording, but then I saw the fun braided kind and I like the way it looks a lot. Here it is now:


I love it. Of course now that the chair has been updated, my desk looks shabby...

30 January 2022

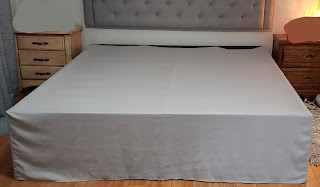
Turning a flat sheet into a bedskirt

Have you priced bed skirts lately? I was finding it difficult to find a bed skirt to fit an 18-inch tall California King frame. I'm not paying $100 just to hide the crap under the bed.

Fortunately, I'm resourceful. I found a flat sheet in the right size (for $20) and here's how I tailored it:

First of all, IRON the sheet. It will look so much nicer. Wrinkles don't fall out over time, no matter how much you try to tell yourself that they will. 

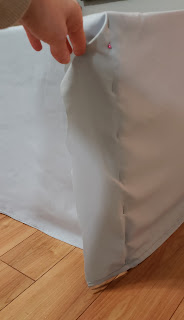
Next, drape the sheet over the bed frame, wrong-side up. Line everything up where you want it. Mine happened to be the perfect size so that all the edges lined up with the floor.

flat sheet into bed skirt DIY

On each corner, pull the bottom corner of the sheet out and pin the sides of the sheet together along the leg of the frame. Make sure the bottom edges line up.

flat sheet into bed skirt DIY

Trim the excess, leaving a few inches of fabric to work with.

flat sheet into bed skirt DIY

Remove the sheet from the bed frame. One at a time, lay each corner flat. Mark where the top and bottom pins are with a pencil. Move the pins over and use a ruler to line up with the marks. Draw a line, to mark where the pins were. Baste along the line. 

flat sheet into bed skirt DIY

(Since the initial measurements were eyeballed, I felt more comfortable basting first. If you're confident in your pinning abilities, go for it with a regular stitch.)

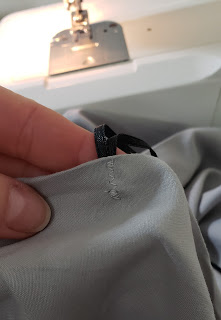
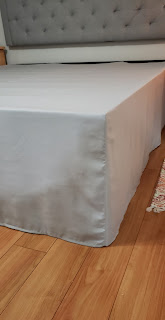
Put the bed skirt back on the bed and, if necessary, make adjustments. Once you're happy with the fit, take it back off and sew using a regular stitch. Trim the excess fabric, then use a zig zag stitch along the raw edges to prevent fraying. Turn the corners right side out and press with a hot steamy iron.

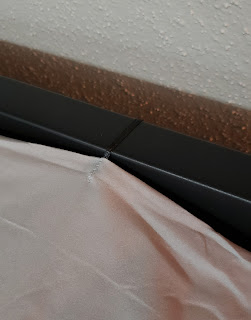
I also added 4 ties (ribbon I had on hand) to the top of the sheet, so that it could be tied to the head of the frame to help keep it in place.

flat sheet into bed skirt DIY

flat sheet into bed skirt DIY

Look at how nice those corners look.

flat sheet into bed skirt DIY

flat sheet into bed skirt DIY

(I still needed to adjust that one corner when I snapped the picture.)
Stick the mattress back on the bed, adjust if it shifted, and you're done.

27 November 2019

portal upgrade

Today, around 3:30 in the afternoon, I decided to start painting my front door.

It's the next thing on the list, I had the paint, it was a nice afternoon, so I went for it.

I've never painted a door before. It went surprisingly fast, standing in basically the same spot, vs painting a room.

I started by washing the door really well with hot soapy water and a sponge, then dried it off.

It took 2 coats of tinted primer, then 1 coat of the real paint.

I am so, so happy with how it looks.

Before:


I don't know why the previous owners chose this color. The best way to describe it... it was a terra cotta color with a mauve undertone. It bugged me every time I walked up to it because it doesn't really go with the other colors on the house, and it's the only thing painted that color.

After:


I don't know what this color is. I matched the color that's on the siding. This color scheme makes so much more sense to me!

It's brighter, happier, and open and I like it.

16 November 2019

bathroom, painted.

I officially hate gray paint colors.

I did not have plans this weekend, other than watching FG's dog while he went hunting, so I figured it would be a great day to finally paint the bathroom. The weather was great, so it was no big deal to keep the doors open all day.

After spending all day priming over the grey color, and getting flashbacks of how much it work it took to cover up the grey guest bathroom in the old house, I finally got my bathroom painted. For simplicity's sake, I chose the same pinkish white that I used in that bathroom and I really like it.

I re-did the trim and baseboards in a nice, crisp white and things look so clean and bright now.


Still have a couple of items on the list before it's done, but this was huge, huge progress. And also, more work than I expected. I'm freaking tired and already sore. Tomorrow is going to hurt.

I uncovered some strange things, like very sloppy grout work that got all over the (dingy) baseboards, and some humongous holes where the toilet paper holder was mounted to the wall (which I now have to go buy spackle for). I'd like to know the story behind that one.

Unfortunately, I have to travel next week back to the border, which recently had some crazy Mexican mafia shit happen, so I'm not thrilled about that, and then I have to travel over the weekend, but maybe soon I'll be able to finish my bathroom.

11 November 2019

Hangover kits

Omg y'all these are so cute.

hangover kit diy

Missy's bachelor(ette)* party is coming up and in addition to my crazy plant favors** for the shower, I wanted to do something fun for the party afterwards.

I have seen these hangover kits on pinterest and thought they were such a cute idea. Who doesn't love hydration and snacks and a painkiller after a night on the riverwalk?

I went to the dollar store and got enough to make 12 kits for about 20 bucks.

It contains:
water
powdered sugar donuts
pretzels
advil
a mint

I put the mint on the outside with hot glue because it was really minty and I didn't want it to make everything else taste minty.

I wanted to get sunglasses, too, but wasn't willing to spend that much money on 12 pairs of sunglasses. It would have been cute, though.

I, myself, travel a little extra than everyone else, so I will have my own gluten free hangover kit, mostly consisting of chips and veggies and cbd oil.

*The shower and the bachelorette/bachelor party is joint. What do you call a joint bachelor/bachelorette party?

**I planted the cuttings today and CROSS YOUR FINGERS that they all live another two weeks and survive the drive to San Antonio.


20 February 2019

DIY floating planter

One of the main reasons why there were so many holes in the pond liner was because there were a lot of rocks in it. Water pressure combined with the weight of the rocks is enough to puncture it. There were even cinderblocks stacked inside the pond to serve as plant stands for the lily pads, which definitely caused problems.

The pond guy suggested getting floating planters when I get more plants.

You can get them on amazon for 35 bucks, ORRRR you can go to the dollar store and make your own for 3 bucks.

Which I did. With a basket, a pool noodle, and some zip ties. So easy, so cheap, and it actually worked!


Went to the store, got a plant, and plopped it in.
I have to admit I was scared when I stuck it in the pond, but it floats perfectly. The plant should eventually grow over the edge enough to conceal the bright blue color.


27 June 2015

pillow power!

I love pillow covers. Especially on the couch pillows, because of one very important reason: They're WASHABLE. Protected from hubby's drool after a particularly restful nap, snacks on the couch, cat hair/barf, visiting toddler chocolate fingers, wine spills, or whatever happens to land on them. Decorative pillows are not typically washable and that has always grossed me out. Another perk? Decorative pillows are not EVEN cheap, man. Making new covers is way cheaper than buying new pillows when I feel like a change.

That being said, I've been itching to change out those covers for a while.

The old pillows matched the kitchen curtains, simply because I had enough fabric left over after making curtains. It's not bad, I'm just over it and ready for something new.


Curtains = Pillows


How BARE does the house look in this pic? That was 1 year ago. We've totally filled it full of junk since then.

So tonight I draggged Chris through the fabric aisles at Hobby Lobby and picked out a few new fabrics and demanded that he form an opinion about them. I (we?) picked out a punchy floral, a mint and gold chevron, and a grey chevron-ish pattern. Can't get away from that chevron, can we?

I used this tutorial for making pillow covers and I love it. I always have to check the tutorial to refresh my memory every time I make one, so I've even printed it out in case the website is ever taken down.

In about an hour, I'd covered every random pillow I could hunt down and put them on the couch. It seems I had gathered a mismatched pillow misfit club.


Anyway, now the misfit pillows get semi-coordinated new life! I love crappy night-time lighting and cell phone pictures, don't you?


Also, I'm a real person with a shade-less lamp on the random table behind the couch, beer bottles and my husband's shorts [for some inexplicable reason] on the coffee table, and so much more... FOCUS on the pillows.

I love them. It's amazing how something so small can make such a difference. I also kinda want to add a pop of orange. Back to the store?


In closing,

1. I really think a slipcover for the blue plaid loveseat or a new paint job on the macaroni and cheese bookshelf needs to happen.
2. I kinda want new kitchen curtains now.

When you give
a mouse a cookie  a girl a project...

19 July 2014

Patio Chair Covers DIY

It's been a rainy summer for us. The mosquitoes are loving it, and we all have evidence on our bodies to prove it. Hubs could not be more pleased about the rainfall because the grass and new sod seem to be doing well. Yes, we're slowly being sucked further in to suburbia...

Speaking of-

We found a standard little table + chairs set for the deck. (The umbrella is actually an old beach umbrella. Yay for improvisation!)


Due to the random changes in weather, we've had to move all the chairs and cushions quite a few times.
Yeah, we could just let them get wet, but we'd like to keep them looking nice for as long as possible.
For a while they went into the garage or under the small bit of roof coverage near the gate and the back door. Which got real annoying, especially when the stacks of chairs would stay there, perfectly in the way, for several days or weeks. Even after it stopped raining. Who wants to move them back and forth all the time?

It was time to come up with a more convenient solution.
Purchasing chair covers was not an option, because after hemorrhaging money when we first moved in, we are definitely back on a budget. Even at $15 for a cheap cover, $15 x6 is more than I'd like to spend.

So I went to the dollar store (woo!) and bought 2 vinyl shower curtains.


All I did was sew 3 sides together to create a very large sleeve. I used clothespins to keep the edges together instead of pins. Took about 10 minutes.

Then I stacked the chairs, put the cushions in the top seat, and slid the cover over it. Done. For $2. Seriously budget friendly and totally functional.


It's not the most exciting or beautiful thing in the world, but it's rained a couple of times and nothing has gotten wet AND it has not blown off. That last part is important.

If I ever feel the urge, I could make covers for each chair, tailor them a little bit more, and maybe choose a pretty patterned shower curtain. But for now, this works great.

05 March 2014

DIY Dinosaur Party Hats- tutorial

The other night we had a dinosaur party hat making party.

My nephew is turning 1 this weekend and his dinosaur-themed party just wouldn't be complete without dino party hats! We made them ourselves and they turned out SUPER cute.


Not pictured:
Start with a 12 x 12 piece of craft paper.
Trace a dinner plate (about 11 inches) and cut out the circles.
Cut spikes out of additional paper; appx 4 inches long.

Now for the pictures:

Cut the circles in half.


Curl the half-circles into cones.


Glue the dino spines onto the edge of the hat with hot glue.


Glue the edges down.


Trim the stuff that's hanging off.


Punch holes in the sides & tie on elastic.


Stick a label on the front.


Put one on and get ready to party!


26 October 2013

DIY Mermaid Costume

It started when I received a text message from Akhtar telling me he got tickets to this costume party. So, naturally I needed a Halloween costume, which started the great debate about how we should all dress.

We debated a few popular culture ideas, but ultimately no one could commit.
I took a few laps around a couple of costume stores, but nothing jumped out at me, especially not for $50.

Then honestly, I'm not exactly sure how I decided on a mermaid, but I decided it should be done- 2 days before the party. The best part? It only cost $15.

So, how did I do it?

A quick trip to Walmart's clearance clothing yielded a bathing suit top and a skirt. Each was $5.
Then to Hobby Lobby for sequins and shells.

Hand-sewing sequins is not something I would recommend when you have 2
days evenings to make a costume.


Drill holes in the shells and sew those on as well.


For the top, drill one hole each in the top & bottom of a shell and sew them to the top.


I hot-glued starfish to hair clips to complete the look.


I topped it off with tons of glitter and shimmery teal & blue eye makeup.

If I had more time to plan and execute the costume, I would have sewn scales on the skirt, much like this:
But, for what it was, it was a hit!